You can configure selective print-out of the incoming faxes by using Print Incoming Routing Method. Depending on the Caller Number and Called Number (DID), incoming fax can be printed to different printers.
The behavior is defined by the so-called rules. Fax Voip FSP always checks Print rules, starting with the rule # 1. The fax will be routed according to the first rule, which satisfies the conditions of the call. All other rules are ignored. For example, if rule # 1 applies for all incoming calls ('Caller ID' = .*; 'Called Number' = .*), then other rules # 2, # 3, etc. applied to incoming calls never be able to work under any conditions.
Every rule can be enabled or disabled. If the rule is disabled, Fax Voip FSP takes this rule into account (as in the case of enabled) but does not print faxes. This can be used to temporarily disable printing for specified Caller (or Called) numbers.
To print an incoming fax to the specified printer, you must:
Incoming fax can be routed to one or more printers.
The maximum supported number of Print rules is specified by the current license. The rules that can not be used in the current configuration of the program are always highlighted in red and ignored.
To view Print fax routing method log, use Enable 'Print' incoming routing method debug logging option, see more details in the Incoming Routing Methods Logs chapter of this user manual.
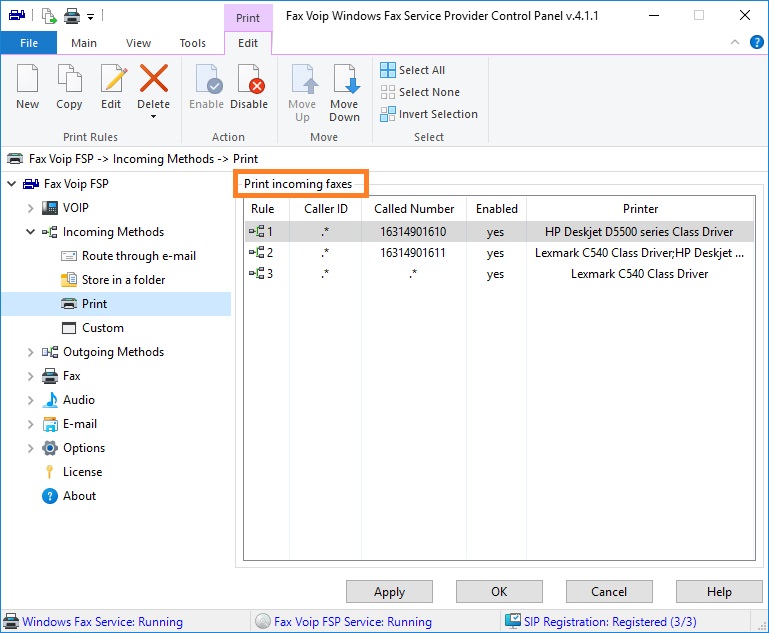
Print incoming faxes table contains the following information:
Rule
Unique number of the current rule.
Caller ID
Specifies the Caller ID pattern for which the rule applies.
Called Number
Specifies the Called Number (DID) pattern for which the current rule applies. Please note, that Fax Voip FSP stores the Called Number (DID) in the Routing Information field, which is available in particular in the Windows Fax and Scan software, in the incoming fax properties.
Enabled
Specifies whether incoming fax printing enabled or disabled. If the rule is disabled, Fax Voip FSP takes this rule into account (as in the case of enabled) but does not print faxes. This can be used to temporarily disable printing for specified Caller (or Called) numbers.
Printer
Displays printers for printing incoming faxes.
The following commands are available in the Print Contextual Tab of the Ribbon:
Click to create new Print rule.
Click to create a copy of the selected Print rule. Can be useful when creating a large number of similar rules. To edit newly created rule, select it and use Edit command.
Click to edit Print rule. One of the entries should be selected. Alternatively you can double-click the selected entry.
Click to delete one or more Print rules. One or more entries should be selected.
Click to delete one or more Print rules. One or more entries should be selected.
Click to delete all rules in the list.
Click to enable the selected rule(s).
Click to disable the selected rule(s). If the rule is disabled, Fax Voip FSP takes this rule into account (as in the case of enabled) but does not print faxes. This can be used to temporarily disable printing for specified Caller (or Called) numbers.
Move the selected rule up.
Move the selected rule down.
Click to select all the entries in the list.
Click to unselect all the entries in the list.
Click to invert the selected entries in the list.
Most of the commands placed on the Print Contextual Tab are also available from the context menu of the list.
Notes