To open Fax Voip FSP Control Panel, click Start, point to Fax Voip FSP; click Fax Voip FSP Control Panel. Alternatively, you can select Fax Voip FSP Control Panel command from the Fax Voip FSP tray icon menu.
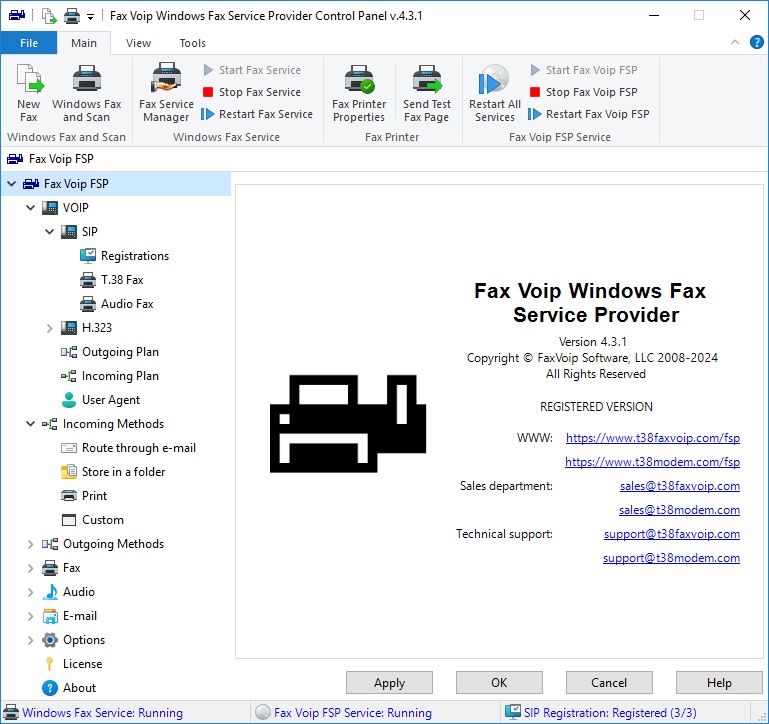
The following basic buttons are always available at the bottom of the Fax Voip FSP Control Panel:
<Apply>
Use this button to save changes in your settings. Please note that all changes are applied immediately.
<OK>
Use this button to save changes in your settings and close Fax Voip FSP Control Panel. Please note that all changes are applied immediately. If the Fax Voip FSP Service is not running, it is started. If the Windows Fax Service is not running, it is started.
<Cancel>
Use this button to close Fax Voip FSP Control Panel without saving changes in your settings.
<Help>
Use this button to view the help file.
The following information is displayed in the status bar:
Windows Fax Service
The current status of the Windows Fax Service is displayed. It should be understood that the Windows Fax Service can be automatically stoped if it is not used by applications and no device is configured to receive faxes.
Fax Voip FSP Service
The current status of the Fax Voip FSP Service is displayed.
SIP Registration
The current status of SIP Registration is displayed. This indicator works when the Fax Voip FSP Service is running and Enable SIP option is checked (see more details in the VOIP Settings chapter). This indicator also shows the number of current SIP registrations (first digit) and the total number of entries in your table of SIP registrations (second digit).
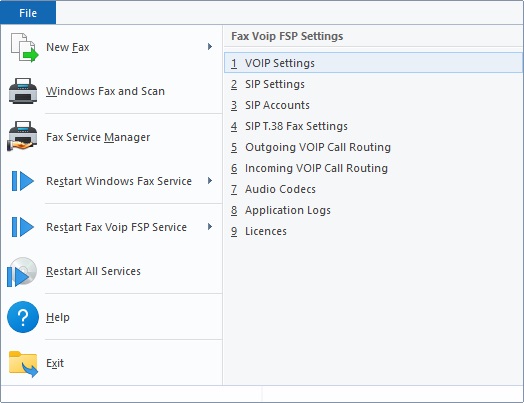
Fax Voip FSP Control Panel Ribbon Commands
The following commands are available in the Application Menu:
Click to create a new fax to be sent to one or more recipients. Any printable document can be sent as a fax.
Click to create a new fax to be sent to one or more recipients. Any printable document can be sent as a fax.
Click to create and send test fax page using Fax printer.
Click to launch Windows Fax and Scan application.
Click to start Microsoft Fax Service Manager. This option is only available on server operating systems, such as Windows Server 2022.
Click to restart Windows Fax Service.
Click to restart Windows Fax Service.
Click to start Windows Fax Service.
Click to stop Windows Fax Service.
Click to restart Fax Voip FSP Service.
Click to restart Fax Voip FSP Service.
Click to start Fax Voip FSP Service.
Click to stop Fax Voip FSP Service.
Click to restart both Windows Fax Service and Fax Voip FSP Service. This command also restarts Mail to Fax and Delivery Receipts system (Fax Voip FSP Mail Service).
Click to open Help file. To display the application help system you also can use Help Button, which is placed in the upper right corner of the Ribbon.
Click to quit the Fax Voip FSP Control Panel.
Click to configure general VoIP settings, such as STUN Server, Display Name and Default Username.
Click to specify the port to listen for SIP requests. Configure default proxy settings for outgoing SIP calls if necessary. See more details in the SIP Settings and Outbound Proxy Settings chapters.
Click to configure SIP accounts to register with your VoIP Service Provider.
Click to configure T.38 behavior. Specify whether application should forcibly send T.38 re-invite to other party or not. See more details in the T.38 Fax Settings (SIP) chapter.
Click to configure Outgoing VOIP Call Routing. At least one rule should be present.
Click to configure Incoming VOIP Call Routing. At least one rule should be present.
Click to specify audio codecs to be used. At least one audio codec should be present.
In the case of trouble, click to enable and view application debug logging. See more details in the Fax Voip FSP Logs chapter.
Click to manage your licences.
The following commands are available in the Main tab:

Click to create a new fax to be sent to one or more recipients. Any printable document can be sent as a fax.
Click to launch Windows Fax and Scan application.
Click to start Microsoft Fax Service Manager. This option is only available on server operating systems, such as Windows Server 2022.
Click to start Windows Fax Service.
Click to stop Windows Fax Service.
Click to restart Windows Fax Service.
Click to show fax printer properties.
Click to create and send test fax page using Fax printer.
Click to restart both Windows Fax Service and Fax Voip FSP Service. This command also restarts Mail to Fax and Delivery Receipts system (Fax Voip FSP Mail Service).
Click to start Fax Voip FSP Service.
Click to stop Fax Voip FSP Service.
Click to restart Fax Voip FSP Service.
Most of the commands placed on the Main tab are also available from the Application Menu.
The following commands are available in the View tab:

Click to show or hide the Navigation Bar.
Click to show or hide the statusbar.
Uncheck this option to hide the Ribbon. After your confirmation the Fax Voip FSP Control Panel will be switched to classic mode. Restarting the application is required.
Flag this option to show the classic Menu Bar. After your confirmation the Fax Voip FSP Control Panel will be switched to classic mode. Restarting the application is required.
This option allows you to choose the Visual Style of the Navigation Bar in accordance with Visual Themes provided by the operating system. Simply choose the desired theme from the Drop-Down Gallery.
This option allows you to choose the HTML help system Toolbar Visual Style in accordance with Visual Themes provided by the operating system. Simply choose the desired theme from the Drop-Down Gallery.
Select this option to use the default Ribbon theme specified by the operating system.
Select this option to customize Ribbon colors. Please note that this option does not work correctly in Windows 11, Windows 10 version 1809 or later, Windows Server 2022 and in Windows Server 2019.
Select the global background color for a customized ribbon.
Select the global highlight color for a customized ribbon (Windows 7 only).
Select the global text color for a customized ribbon.
Use this option to restore the default view of the Fax Voip FSP Control Panel. This function does not change your SIP, H.323, Fax and other settings.
Most of the commands placed on the View tab are also available from the Navigation Bar context menu.
The following commands are available in the Tools tab:

Click to repair Windows Fax Service components, reinstall Fax Voip FSP Service and register Fax Voip Windows Fax Service Provider and Fax Voip FSP Routing Extension with the fax service. See more details in the To register Fax Voip Windows Fax Service Provider (FSP) with Fax Service chapter of this user manual.
Click to open Contacts folder.
Allows you to add a new contact card to your Contacts.
Click to find people in your Contacts.
Opens Address Book (Windows Contacts).
Click to create a backup copy of your current settings.
Click to restore settings from backup.
Some Ribbon commands are contained in the so called Contextual Tabs which are available depending on the context. These commands are described separately in the appropriate chapters.
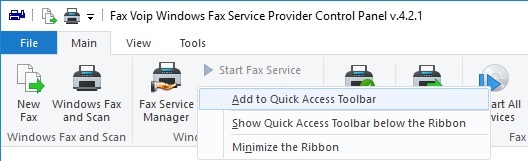
The Quick Access Toolbar (QAT) is a small, customizable toolbar that exposes a set of Commands that are specified by the application or selected by the user.

By default, the Quick Access Toolbar (QAT) is located in the title bar of the Fax Voip FSP Control Panel window but can be configured to display below the ribbon. In addition to exposing Commands, the Quick Access Toolbar (QAT) also includes a customizable drop-down menu that contains the complete set of default Quick Access Toolbar (QAT) Commands (whether hidden or displayed in the Quick Access Toolbar (QAT)) and a set of Quick Access Toolbar (QAT) and ribbon options. Almost all ribbon controls can be added to the Quick Access Toolbar (QAT) through the context menu shown in the following screen shot.