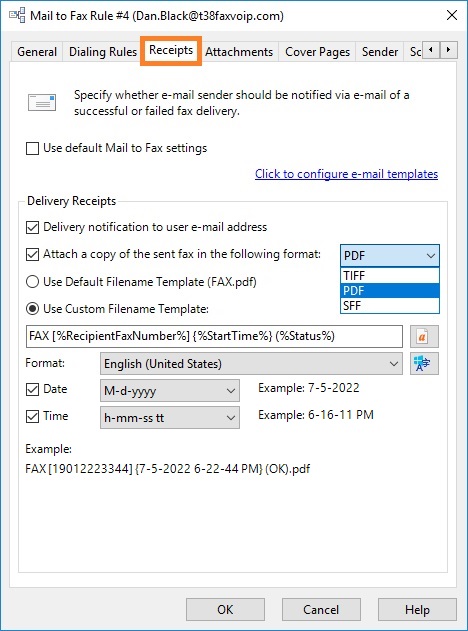
Receipts Settings
On this page you can override the default settings for fax delivery notifications specified in the Delivery Receipts Settings (Mail to Fax).
Use default Mail to Fax settings
If this option checked, the default settings for fax delivery notifications are used.
Click to configure e-mail templates
Click to switch to the Templates page.
Delivery Receipts
In this area, you can specify custom settings for fax delivery notifications that will be applied to the current rule only.
Specifies whether to send a notification of a successful or failed fax delivery to the sender's e-mail address.
Attach a copy of the sent fax in the following format
Specifies whether a copy of the sent fax should be attached to the e-mail message. Select the file format in which you want to receive a copy of the sent fax. Can be TIFF, PDF or SFF. Note that this option is ignored in the case of any errors in the fax job creation (not possible to convert your original document into the fax format, the specified fax number is invalid, e-mail address is blocked etc.). In this case the delivery notification is always sent without fax attachment.
The options below are responsible for how file names are generated for the attached faxes.
Use Default Filename Template (FAX...)
Select this option to use default filename template with the current rule. When specifying the default filename template, the fax attachment name is FAX.tif, FAX.pdf or FAX.sff (depending on the selected format).
Use Custom Filename Template:
Select this option to specify custom filename template in the text box below. Filename template may contain arbitrary text, as well as so-called %variables% that are replaced by actual data (e.g. %RecipientFaxNumber%, %StartTime%, %PagesTransferred% etc.). Filename template can not contain any of the following characters: \ / : * ? " < > | ; An example of file name for the current filename template (taking into account the selected date and time formats) is shown below under Example.
Insert a variable
Use this button to insert a variable in the text box on the left, where the custom filename template is specified. To insert a variable into the text, place the cursor in the desired location (or select text segment that you want to replace), press the button and then select a variable from the drop-down menu.
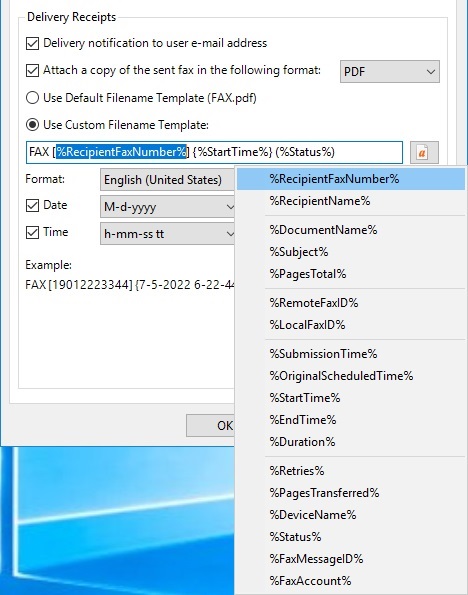
The following variables can be used with custom filename template (replaced by actual data):
Format
Select the locale (region and language) to specify how to display date and time values for the current filename template. This selection affects the display of date and time values defined by the following variables: %SubmissionTime%, %OriginalScheduledTime%, %StartTime%, %EndTime%. By default, the date and time is formatted in accordance with operating system settings.
Use default date and time formats that match Windows display language
Click this button to select date and time formats that match Windows display language (for the current user).
Date
Check this box to use the date part of DateTime value. Select date format from the drop-down list. Available date formats depend on the selected locale (region and language). Slashes ' / ' that cannot be used in file names are replaced with dashes ' - '. An example of the formatting for the current selection is shown on the right under Example.
Time
Check this box to use the time part of DateTime value. Select time format from the drop-down list. Available time formats depend on the selected locale (region and language). Colon characters ' : ' that cannot be used in file names are replaced with dashes ' - '. An example of the formatting for the current selection is shown on the right under Example.
Example
An example of file name for the current filename template (taking into account the selected date and time formats, as well as the selected fax format).
Notes