Using Fax Voip T.38 Modem with Fax and Voice software
With Fax Voip T.38 Modem you may set up and use Windows Fax service or any other third-party fax or voice application to send/receive faxes or audio messages via VoIP without hardware modems. Fax Voip T.38 Modem emulates fax voice modems (Fax Class 1 protocol compliant). Virtual COM Port (modem) interface is a bridge between your fax or voice software and VoIP.
To configure your fax (voice) software, select the Fax Voip 14.4K TAPI Voice-Fax Modem device in the settings of your software. Depending on your software, you may need to specify the serial port instead of a modem. In this case, select the port associated with Fax Voip T.38 Modem e.g. COM20. Also, you usually need to configure your software to automatically answer incoming calls.
Fax Voip T.38 Modem has been successfully tested with many well-known fax and voice programs. To help you successfully configure your favorite fax software to operate with Fax Voip Virtual COM Ports (modems) we have written detailed instructions that you can find in the user manual.
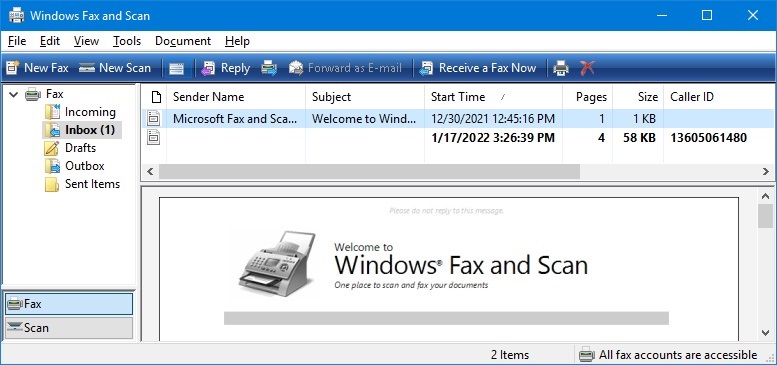
Microsoft Fax (Windows Fax service) *
Windows Fax Service and Windows Fax and Scan application is an integrated fax software included in all Windows versions. Microsoft Fax is an extensible fax platform that you can use to deploy shared fax resources in your organization. Users within an organization can install a connection to a remote fax printer on a network fax server and send and receive faxes using shared fax devices located on the server, as well as from a local fax device attached to their computers. Fax administrators can configure, manage, and monitor these shared fax resources. Centralized management of server-based shared fax devices means easier management and maintenance, and lower costs. Fax users can send and receive faxes without the need to use manual fax machines, saving time and effort.
In addition to the standard Microsoft Fax functions, Fax Voip T.38 Modem includes some more features when working with Windows Fax Service: in particular E-mail to Fax based on using Microsoft Fax Service and Incoming Routing Methods (Microsoft Fax): E-mail, Store in Folder, Print, Custom with possibility to do routing based on Called Number (DID) and without being tied to a specific modem device.
The maximum allowed number of fax modem devices that can be used with Windows Fax Service depends on the operating system. On Windows 11, Windows 10, Windows 8/8.1 and Windows 7, the fax device limit is one. On Windows Server 2025, Windows Server 2022, Windows Server 2019, Windows Server 2016, Windows Server 2012/2012R2, Windows Server 2008R2, Enterprise or Datacenter Edition, there is no fax device limit. On other versions of Windows 2008R2, the fax device limit is usually four.
* When using Microsoft Fax and Windows Fax and Scan, we currently recommend you to use other solution, Fax Voip Windows Fax Service Provider (Fax Voip FSP). Fax Voip FSP replaces the standard Microsoft Modem Device Provider by the Fax Voip T.38/G.711FAX Device Provider. This allows you to use the Windows Fax Service most efficiently. In particular, the ECM (Error Correction Mode) is supported. The busy signal is also detected correct way. Fax Voip FSP implements Fax Voip FSP Routing Extension that is integrated into the Windows Fax Service. Fax Voip FSP stores the Called Number (DID) in the Routing Information field, which is available in particular in the Windows Fax and Scan software, in the incoming fax properties (no workarounds are used). Outgoing Fax Routing Methods implemented in Fax Voip FSP work regardless of the user account under which the fax job was created. Using Fax Service Provider (FSP) instead of Virtual COM Ports and modems significantly improves reliability of your fax system.
FaxTalk Messenger Pro 7.5

With the FaxTalk Messenger Pro 7.5 answering machine and fax software, you have all the tools needed to manage your voice messages and faxes quickly, efficiently and easily. The powerful voice messaging capabilities can turn your small office or home office into a sophisticated call handling operation with the ease of an answering machine. FaxTalk Messenger Pro’s advanced fax capabilities eliminates the need for a stand-alone fax machine and provides you with a central place to store and manage your fax communications. With easy-to-use, powerful voice and fax features, FaxTalk Messenger Pro 7.5 delivers an affordable and complete voice messaging and fax software solution that conveniently manages all of your voice messages and faxes.

Caution! Do not use the latest FaxTalk version, that is available for downloading on the official website. Due to numerous bugs in FaxTalk Messenger Pro 9 and FaxTalk Messenger Pro 8, they don't work with Fax Voip modems. And although the modem is properly detected during the installation of the program, the FaxTalk then continuously generates stupid errors during any attempt to initialize the modem.
BVRP Classic Phone Tools 9

Classic PhoneTools is an easy way to turn your PC into a complete communication tool. PhoneTools software package provides advanced communication features that easily integrate with your current Windows based system. Classic PhoneTools makes it possible for you to email, fax, telephone and receive voice messages on your PC from a single, efficient interface. Classic PhoneTools 9 is ideal for professional or personal use and offers rich features including powerful fax capabilities, customizable voice mail and email, phone from PC, and automatic modem detection.
CallStation
CallStation is a very simple but full-featured telephone utility that implements the functions of the answering machine with possibility to receive faxes.

CallStation is a TAPI compliant software and can operate with Fax Voip T.38 Modem only via Fax Voip 14.4K TAPI Voice-Fax Modem driver.