This chapter shows you how to quickly configure the Fax Voip Softphone to operate using H.323. H.323 provider usually uses authentication based on IP-address of the user. To configure Fax Voip Softphone in this case you usually need to choose Do not use Gatekeeper option, and to specify the name or IP-address of the H.323 endpoint when creating rule for outgoing VOIP calls.
In some cases, you may need to use registration with H.323 gatekeeper. To configure Fax Voip Softphone in this case, you must choose Use Gatekeeper option, specify the IP-address of the gatekeeper, and select Route calls to Gatekeeper option when creating rule for outgoing VOIP calls. Using of H.235 authentication is convenient for the case of dynamic IP-address of the computer.
To configure Fax Voip Softphone follow these steps:
1. In the Fax Voip Softphone Control Panel click VOIP in the tree.
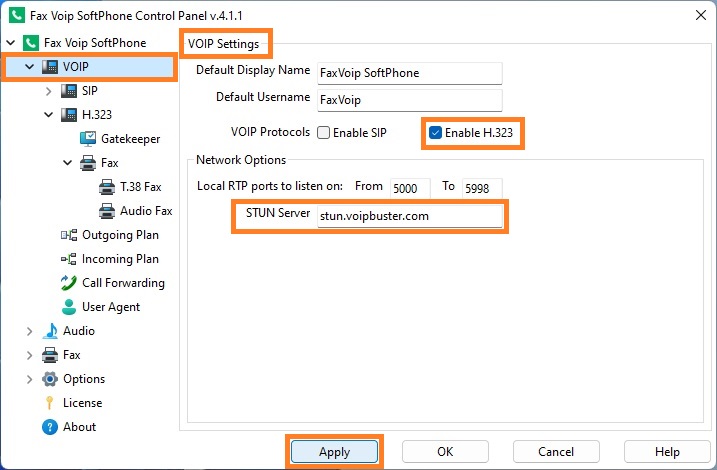
2. Check Enable H.323 option.
3. (Optional) In the STUN Server box enter STUN Server name, if necessary for correct operation or recommended by your H.323 provider. (Examples: 'stun.voipbuster.com', 'stun01.sipphone.com', 'stun.yourstunserver.com:3478',...).
4. Click <Apply> button.
5. In the Fax Voip Softphone Control Panel click VOIP in the tree, and then click H.323.

6. In the Local H.323 address field select or enter network interface address to listen for H.323 requests. In the port field, enter the port number. ' * ' is all network interfaces and can be recommended for using at least for the first time. When selecting the port number you should understand that the selected port is not used by another H.323 program installed on your computer. Fax Voip Softphone uses port 1720 by default.
7. Make the necessary settings with the Enable Fast Start and Enable H.245 Tunneling options, according to the requirements of your H.323 network.
8. Add your H.323 phone number to the Telephone numbers list. To add a number click <New> button. The phone numbers specified in this list are used in the process of registration with H.323 Gatekeeper (if registration with H.323 Gatekeeper is used). The top number from the Telephone numbers list will be recognized by remote party as Caller ID Number.
9. Click <Apply> button.
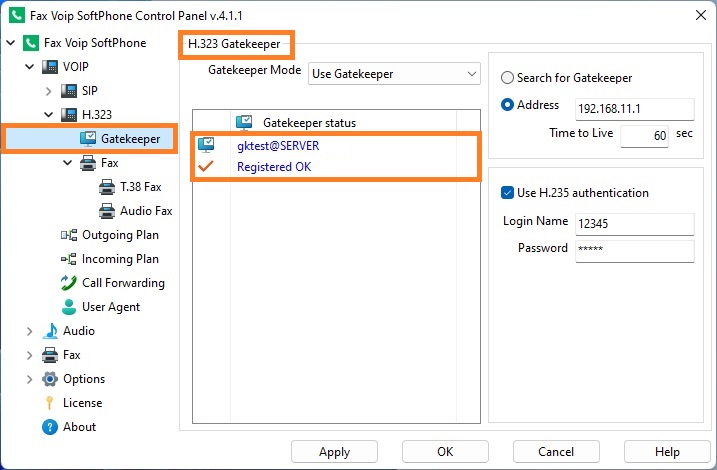
10. In the Fax Voip Softphone Control Panel click VOIP in the tree, then click H.323, and then click Gatekeeper.
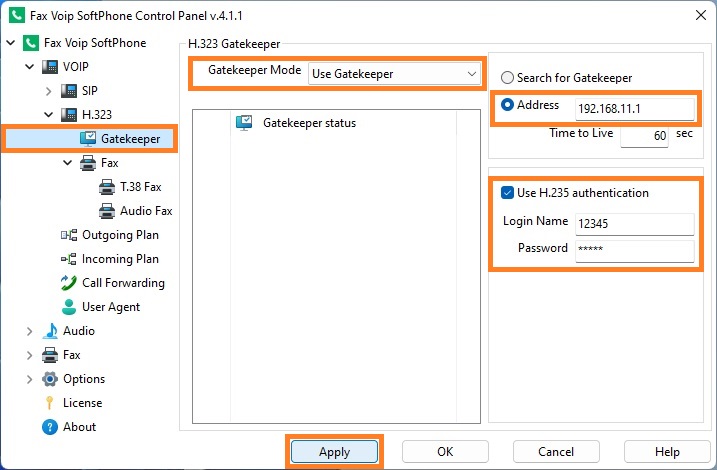
11. Do the necessary settings:
Gatekeeper Mode
Do not use Gatekeeper (default)
In this mode Fax Voip Softphone operates as independent H.323 endpoint and does not register with H.323 Gatekeeper. All incoming H.323 calls should be routed directly to IP address and port where Fax Voip Softphone operates. This mode is preferable in the case when your H.323 provider uses your IP-address to identify you (the most common method of binding used for authentication).
Use Gatekeeper
In this mode Fax Voip Softphone should be registered with H.323 Gatekeeper.
Search for Gatekeeper
In this mode Fax Voip Softphone is able to find the H.323 Gatekeeper automatically. Option is useful if you register with the Gatekeeper located in your local network.
Address
The H.323 Gatekeeper IP address or server name.
Time to Live
The Time To Live parameter is the duration (in seconds) for which registration with the H.323 Gatekeeper is valid. Note that this parameter can be overridden by the Gatekeeper during registration.
Use H.235 authentication
Check this option if Gatekeeper requires authentication. The H.235 cryptoTokens by MD5 hashing are used.
Login Name
H.235 login credential for authentication.
Password
H.235 password credential for authentication.
12. To be possible to do outgoing H.323 calls, you should create Outgoing VOIP Call Routing rules. Note that Fax Voip Softphone does not create rules for outgoing H.323 calls automatically. In the Fax Voip Softphone Control Panel click VOIP in the tree, and then click Outgoing Plan.
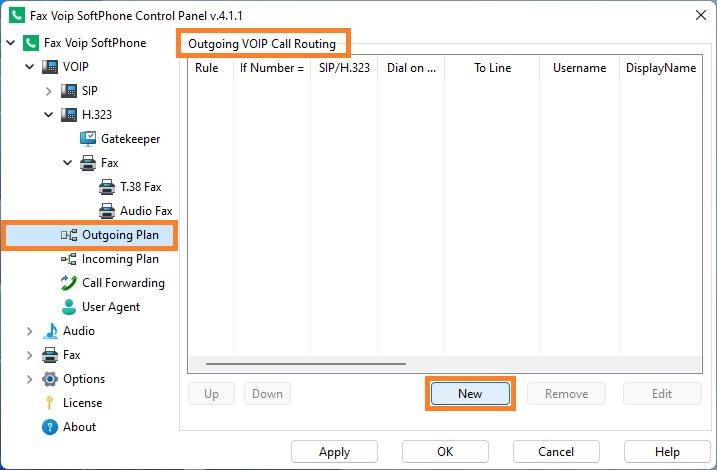
13. To create new Outgoing VOIP Call Routing rule click <New> button.
14. In the Outgoing VOIP Call Routing rule window, in the Dial on Line area, specify the address of H.323 enpoint where to route H.323 calls (in the Route to address field) or select Route calls to Gatekeeper option to route calls via H.323 Gatekeeper. Click <OK> button.
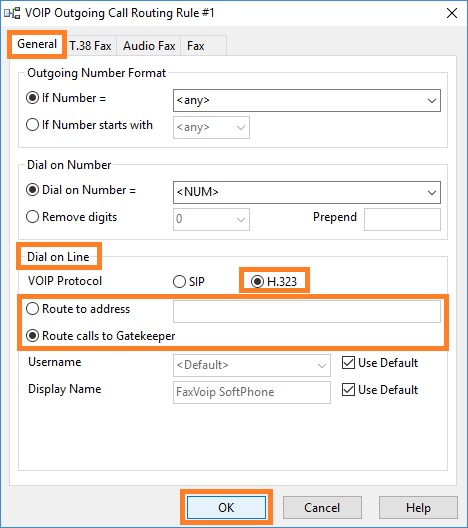
15. At the picture below all outgoing calls will be routed via H.323 Gatekeeper.
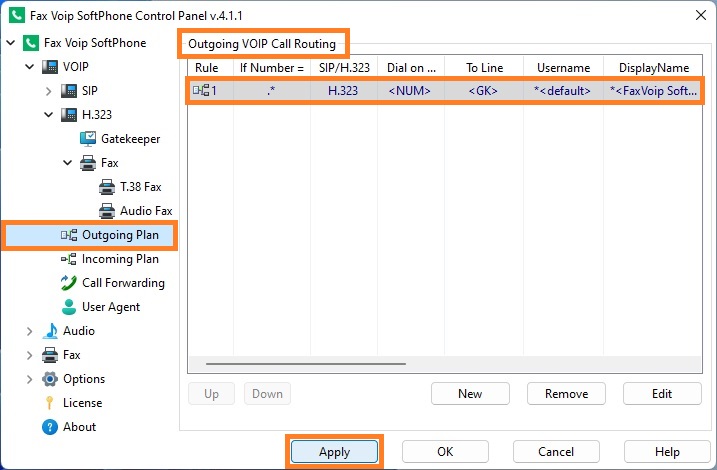
16. Click <Apply> to save Outgoing VOIP Call Routing rules.
17. In the Fax Voip Softphone Control Panel click VOIP in the tree, and then click Incoming Plan. The Incoming VOIP Call Routing panel will be displayed. Make sure that you have a rule for incoming H.323 calls (the default rule is created when you install Fax Voip Softphone). By default, all incoming H.323 calls are accepted as Voice Calls.

18. If Gatekeeper is used, the status of H.323 Registration can be viewed In the Gatekeeper panel. When properly configured, you should see 'Registered OK' in the Gatekeeper status area.
19. The status of H.323 Registration is also displayed in the Info panel of the main application window.
