Direct Converting to Fax feature allows to convert some of the most popular graphics file formats into compatible fax format (TIFF), which is used in Fax Voip Softphone.
The main features of Direct Converting to Fax:
Currently supported file formats (can be converted to fax directly):
*.pdf (Adobe PDF file) (default)
*.tif, *.tiff (TIFF Image) (default)
*.sff (Structured Fax File) (default)
*.qfx (Ventafax QFX File) (default)
*.bmp (Bitmap Image)
*.jpg, *.jpeg (JPEG Image)
*.gif (GIF Image)
*.png (PNG Image)
*.ico (Icon)
*.wmf, *.emf (Windows Meta File)
To create the fax using Direct Converting to Fax function, use New Fax button in the Bottom Panel of the main application window. See also in the Send a Fax from the Fax Panel chapter of this user manual.
Using of Direct Converting to Fax function is the most convenient way to convert PDF files into TIFF format as the installation of Adobe Reader as well as Acrobat Wrapper are not required in this case.
In order to use Direct Converting to Fax feature when preparing outgoing faxes, you should configure it (see also in the Convert to Fax Settings chapter of this user manual):
1. Open Fax Voip Softphone Control Panel.
2. Click Fax in the TreeView, then click Fax Converter.
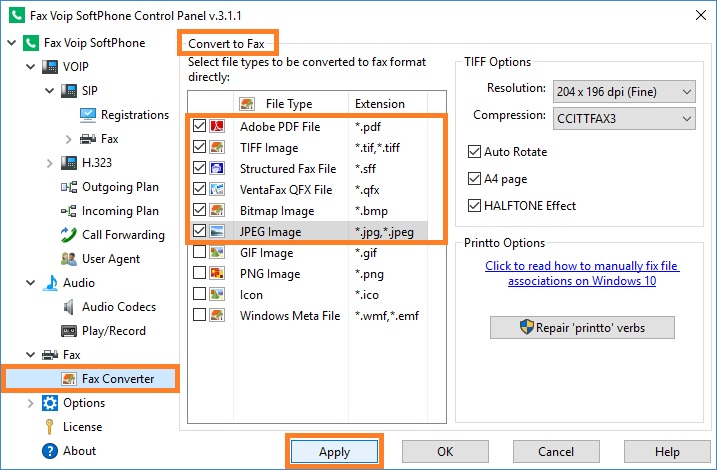
3. In the Select file types to be converted to fax format directly table, select file types for which the Direct Converting to Fax procedure will be applied.
4. In the TIFF Options area, in the Resolution field, select 204x196 dpi (Fine) if you want to send faxes in high-quality resolution (Fine). Or select 204x98 dpi (Normal) if you want to send faxes in Normal resolution. The fax in Normal resolution is transmitted two times faster than the fax in Fine resolution. This option does not depend on the similar Printer Resolution option in the Fax Soft Virtual Printer settings.
5. Select Compression format of the output TIFF file. Fax Voip Softphone can convert original documents into TIFF using the following TIFF compression formats: PACKBITS, CCITTFAX3, CCITTFAX4, LZW, NO COMPRESSION. Any of these formats can be used for outgoing faxes. In general case, we recommend to select CCITTFAX3 or CCITTFAX4. In the case of converting a large number of color pictures with HALFTONE Effect option selected, better to select LZW compression since it saves disk space. Note that this option does not affect the quality, the time of transmitting and other properties of the fax when sending.
6. Check Auto Rotate option, to use the automatic orientation selection algorithm. If this option is selected and the original document is in landscape orientation, the document will be rotated 90 degrees clockwise when converting into fax format. If this option is not selected, the original orientation will be preserved.
7. Check A4 page option, if you want to send A4 page fax. If this option selected, Fax Voip Softphone sets the page width to 1728 and the page height in the range of 1100...1210 (if 204x98 dpi) or in the range of 2200...2420 (if 204x196 dpi). If this option not selected, Fax Voip Softphone does not control the page height.
8. Check HALFTONE Effect option, to be possible to send faxes of good quality when converting color documents to fax. Halftone is the reprographic technique that simulates continuous tone imagery through the use of dots, varying either in size, in shape or in spacing. If this option is not selected, the color image converted to black and white fax format, will be of very low quality. It should be noted that in the case of Direct Converting the default Windows settings are used when HALFTONE function applies. In the case of converting a large number of color pictures with HALFTONE Effect option selected, better to select LZW compression since it saves disk space. However if the fax is created from a color document and HALFTONE effect option selected, the time of transmittion will be large enough. Fax, created using the Fax Soft Virtual Printer (the same color document) has acceptable quality and is transmitted much faster. Note also that in the case of Direct Converting of PDF files containing color images, this option is ignored, a HALFTONE effect is always applied, the size of TIFF file and the time of fax transmission are not very large and the quality of fax is acceptable.
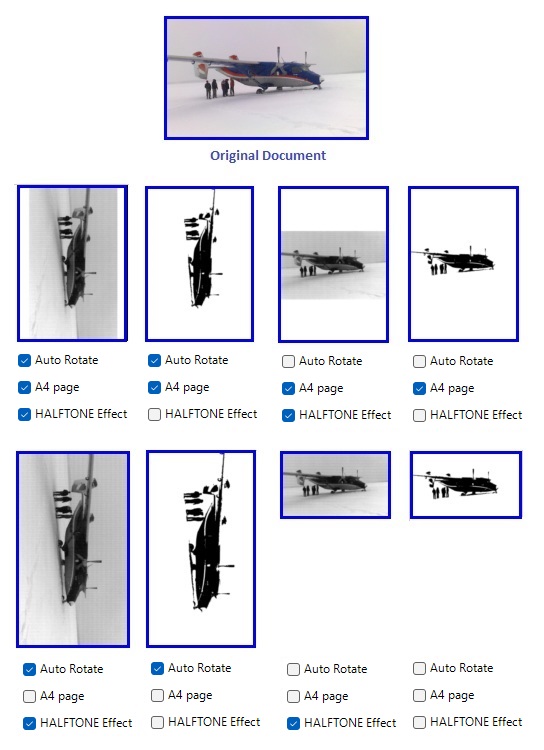
9. The results of applying different combinations of the above options are shown in the picture below.
10. Click Apply button to save settings. All the changes are applied immediately.
To create or send a fax (using Direct Converting to Fax)
1. Open the Bottom Panel (Audio and Fax). In the main application window click the Toggle bottom panel (<< >>) button.
2. In the Bottom Panel, click the New Fax button in the toolbar.
3. In the Fax message selection dialog, select the document you want to send as a fax, and then click Open. See also in the Send a fax from Fax Panel chapter of this user manual.
4. Follow the instructions in the Create Fax Wizard. You can send a fax directly from the Create Fax Wizard, or store a fax for later sending. More information can be found in the Send a Fax with Create Fax Wizard chapter of this manual.
Notes