Sharing Fax Resources
A fax printer located on a central fax server (Windows Server OS) can be shared among network users. Users can install remote fax printer connections to the fax server on their client computers (Windows 11, Windows 10 etc.), and thus send and receive faxes using fax devices located on the fax server.
You cannot share fax resources on a workstation based operating system such as Windows 11, Windows 10 or Windows 8/8.1.
The instructions below assume that both computers (server and client) are configured as members of a workgroup.
To configure Fax Server (Windows Server 2025)
- 1
To share a fax printer
1. Switch to Search pane, type control panel, and then click Control Panel. In the Control Panel, under Hardware, click View devices and printers, and then click Printers & scanners. In the list of printers, click Fax, and then click Printer properties. Alternatively, you can click Fax Printer Properties in the Fax Voip FSP Control Panel, in the Main tab of the Ribbon.
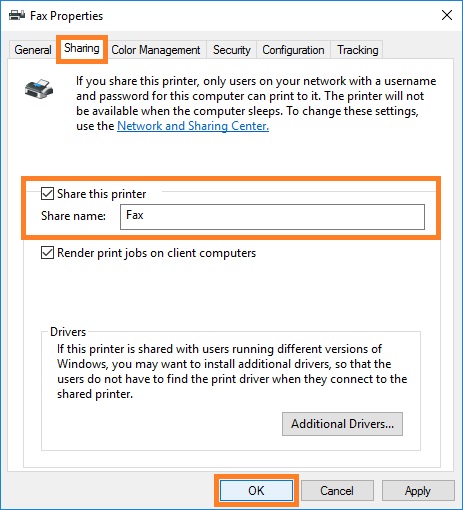
2. In the Fax Properties window, click the Sharing tab, select Share this printer, and then type a name for the printer that you want your network users to see. Then, click OK.
- 2
Set up user accounts
Your users must have an account to be able to access a fax server running Windows Server 2025.
To add a local user account, follow these steps:
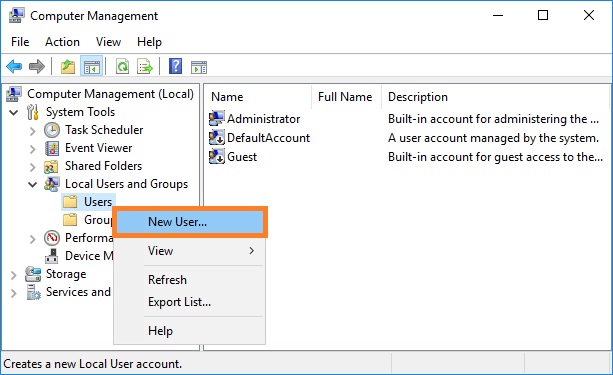
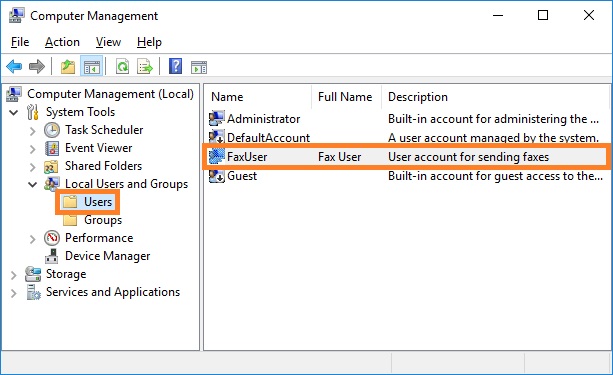
1. Right click the Start button, and then click Computer Management. In the Computer Management, expand Local Users and Groups, right-click on Users, and then select New User.
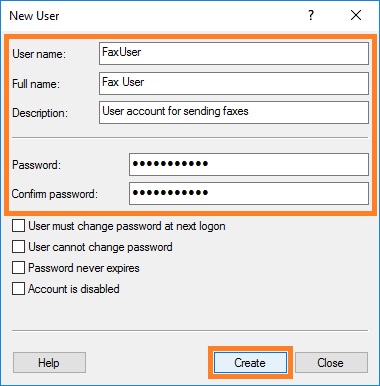
2. In the New User window, enter the user name and password. Below the section where you enter the passwords, you will see four options connected to how the password will be treated. Choose the one that makes sense to you, click Create to create the user, and then close the window.
3. In the Computer Management, make sure the new user is displayed in the list of users.
You can configure a fax server so that when a user uses Windows Fax and Scan for the first time to send a fax, an account is automatically created. If you use this option, as soon as a user connects to the fax server, the account is automatically created.
If you want to limit users connecting to the fax server, you can disable this setting, in which case you must manually create the user accounts for all the users who need to access the fax server. In such a setting, if a user tries to connect to the server without having an account already, the connection attempt fails.
To automatically create a user account for a fax server, follow these steps:
1. Click the Start button, and then click Server Manager. In the Server Manager, select Fax Service Manager from the Tools menu. Alternatively, you can select Fax Service Manager command from the Fax Voip FSP tray icon menu or click Fax Service Manager in the Fax Voip FSP Control Panel, in the Main tab of the Ribbon.
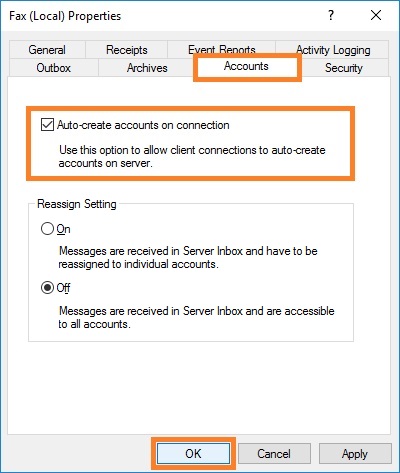
2. In the Microsoft Fax Service Manager, in the left pane right click on the Fax. On the context menu, click Properties. In the Fax (Local) Properties window, on the Accounts tab, select the Auto-create accounts on connection check box so that an Administrator does not need to explicitly create each user account. Click OK.
To manually add a user account for a fax server, follow these steps:
1. Click the Start button, and then click Server Manager. In the Server Manager, select Fax Service Manager from the Tools menu. Alternatively, you can select Fax Service Manager command from the Fax Voip FSP tray icon menu or click Fax Service Manager in the Fax Voip FSP Control Panel, in the Main tab of the Ribbon.
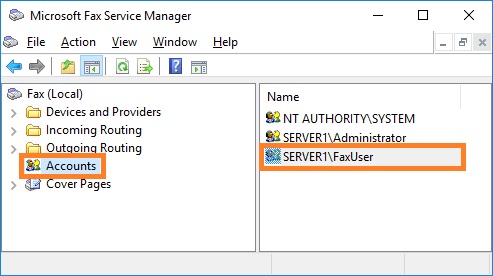
2. In the Microsoft Fax Service Manager, in the left pane double-click Fax, and then click Accounts.
3. In the right pane, view the existing accounts, and then determine which new accounts you want to add.
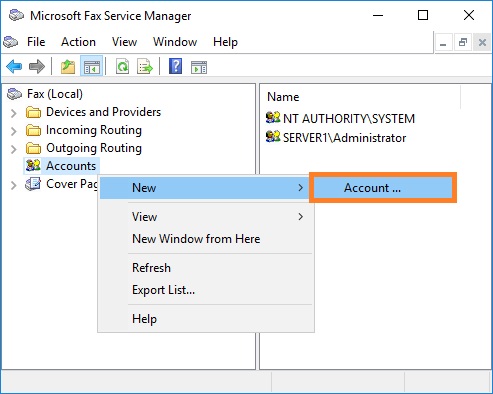
4. To add a new account, right-click Accounts, click New, and then click Account.
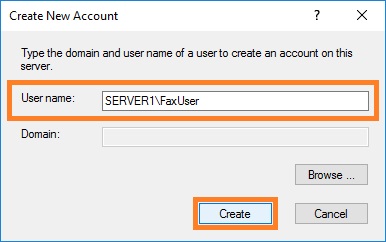
5. In Create New Account window, provide a user name and domain, and then click Create. Note that the user name must match the local user account you created earlier.
6. In the Microsoft Fax Service Manager, make sure the new account is displayed in the list of accounts.
- 3
To configure access the fax server inbox
To allow all user accounts to access the fax server inbox and view incoming messages, follow these steps:
1. Click the Start button, and then click Server Manager. In the Server Manager, select Fax Service Manager from the Tools menu. Alternatively, you can select Fax Service Manager command from the Fax Voip FSP tray icon menu or click Fax Service Manager in the Fax Voip FSP Control Panel, in the Main tab of the Ribbon.
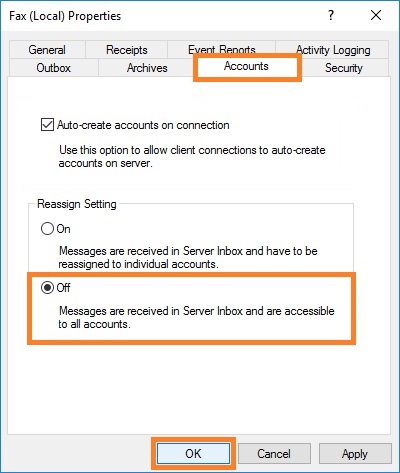
2. In the Microsoft Fax Service Manager, in the left pane right click on the Fax. On the context menu, click Properties. In the Fax (Local) Properties window, on the Accounts tab, in the Reassign Setting area, select Off option to allow all user accounts to access the fax server inbox and view incoming messages. Click OK.
To allow individual user accounts to access the fax server inbox and view incoming messages, follow these steps:
1. Click the Start button, and then click Server Manager. In the Server Manager, select Fax Service Manager from the Tools menu. Alternatively, you can select Fax Service Manager command from the Fax Voip FSP tray icon menu or click Fax Service Manager in the Fax Voip FSP Control Panel, in the Main tab of the Ribbon.
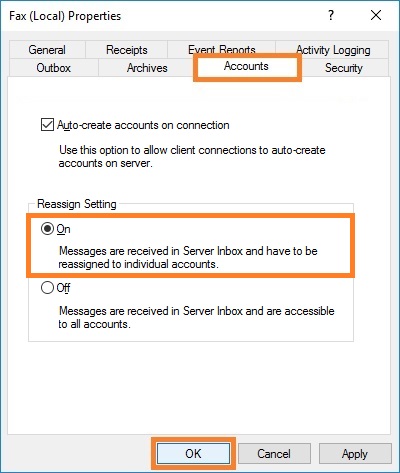
2. In the Microsoft Fax Service Manager, in the left pane right click on the Fax. On the context menu, click Properties. In the Fax (Local) Properties window, on the Accounts tab, in the Reassign Setting area, select On option to reassign received fax messages to individual user accounts only. Click OK.
3. In the Microsoft Fax Service Manager, in the left pane right click on the Fax; on the context menu, click Properties; in the Fax (Local) Properties window switch to Security page.
4. On the Security page, click Advanced.
5. In the Advanced Security Settings for Fax window, select the permission entry associated with the desired user account and click Edit. If the permission entry does not exist, click Add, click Select a principal, type user accounts name, click Check Names, click OK.
6. In the Permission Entry for Fax window, click Show advanced permissions. Select the Manage server receive folder check box. Click OK. See picture below.
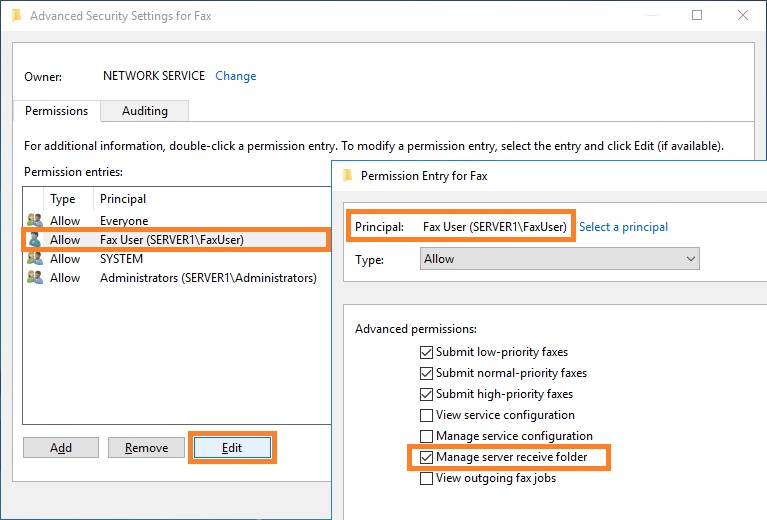
7. In the Advanced Security Settings for Fax window, click OK.
To configure Fax Client (Windows 11)
- 1
To connect a client computer to fax server located in your network
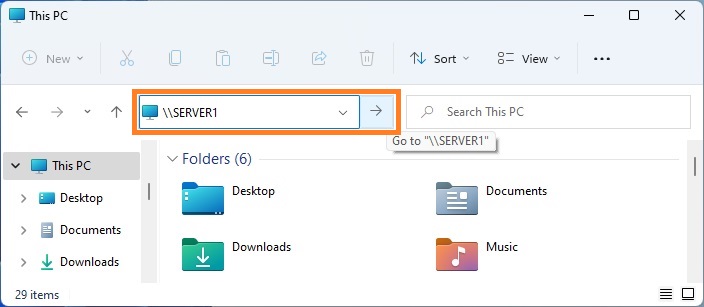
1. In Windows Explorer, enter the name or address of the computer (Windows Server OS) in your network on which the shared fax server is installed. Click the Go to... button or press the Enter key.
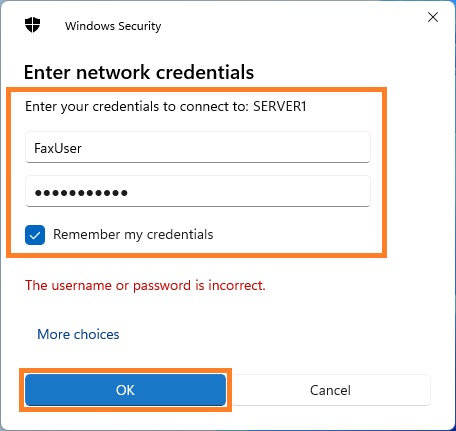
2. In the Windows Security window, enter the username and password associated with the user account created on the server for sending faxes, see above. Select Remember my credentials checkbox, this is very important. Click OK.
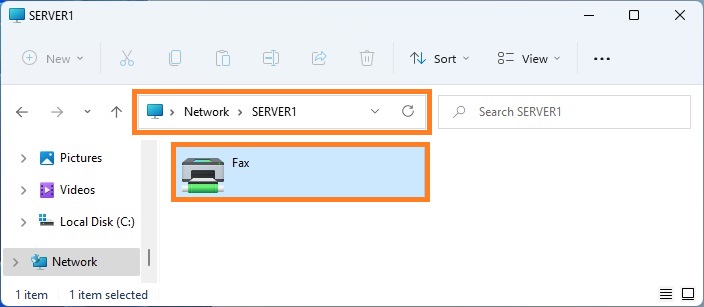
3. Make sure that the shared Fax printer is displayed in the folder.
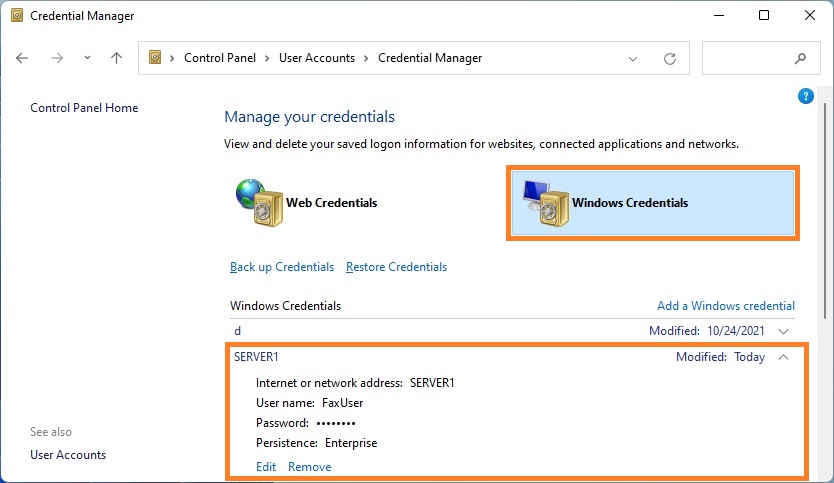
4. Switch to Search pane, type control panel, and then click Control Panel. In the Control Panel click User Accounts, and then click Manage Windows Credentials.

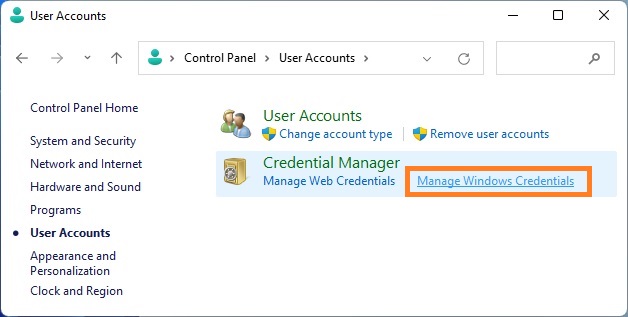
5. In the Credential Manager, on Windows Credentials page make sure that you have an entry associated with your server computer and the user account created on the server for sending faxes. If there is no entry, create it by clicking the Add a Windows credential link, see picture below.
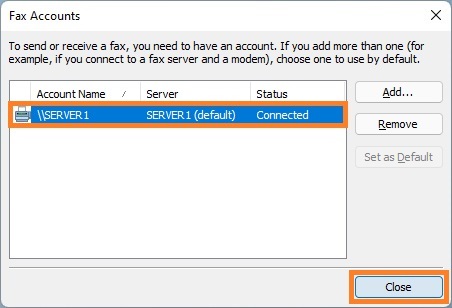
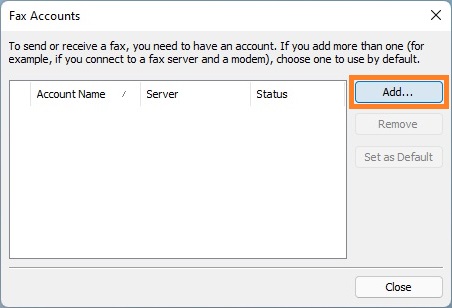
6. Switch to Search pane, type fax and scan, and then click Windows Fax and Scan. In Windows Fax and Scan, on the Tools menu, click Fax Account... . Click Add... .
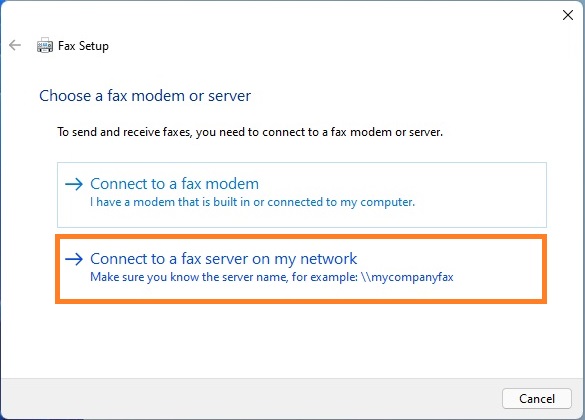
7. On the Choose a fax modem or server page click Connect to a fax server on my network.
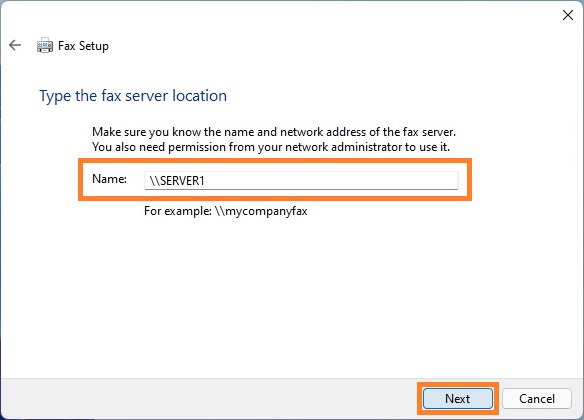
8. On the Type the fax server location page, enter the name or address of the computer (Windows Server OS) in your network on which the shared fax server is installed. Follow the instructions of the wizard.
9. Make sure that the fax account was created successfully.