You can open the Log Book by clicking on the Log Book button in the main toolbar or by selecting the Log Book command in the Fax Voip Softphone tray menu.
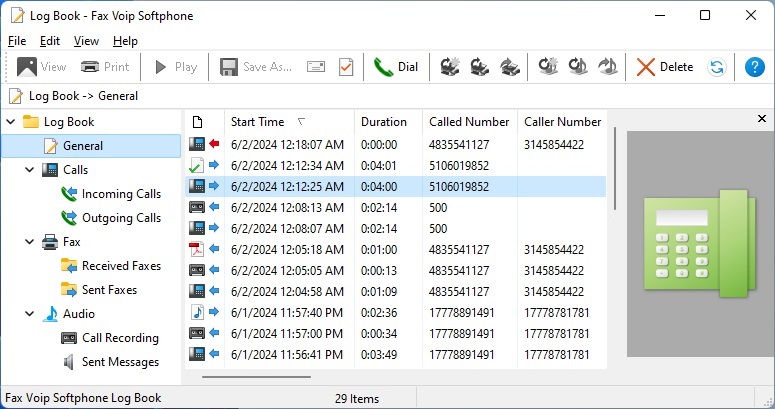
The Log Book keeps information about all incoming and outgoing phone calls as well as outgoing and received faxes, call recording and outgoing audio messages. You can also scroll up and down to see the chronological sequence of events.
You may dial any Log Book entry: e.g. dial back a Missed call number, or redial a Log Book entry. Select the line of the chosen call and the Dial button becomes enabled and clickable. Note that dialing/redialing Log Book entries depends on PBX and Fax Voip Softphone settings and may not necessarily be successful.
Received or sent faxes can be easily viewed in the Preview Panel. Or you can view the fax in the TIFF viewer software, Adobe Acrobat Reader or SFF viewer software by double-clicking on it.
Call recording as well as outgoing audio messages can be easily listen by using the Preview Panel. To open any audio file in the audio player software, double-click on it.
The entries can be sorted on the any available field. To select the sort field, click on the header of the field and an arrow will appear. Click again on the arrow to sort the list in the ascending or descending order.
You can choose between 7 folders:
The following commands are available in the Log Book Toolbar:
Click to view the selected fax in the TIFF viewer software.
Click to print the selected fax.
Click to play the selected audio message using the external audio player.
Click to save the selected fax or audio message.
Click to send the selected fax or audio message by mail.
Click to view properties of the selected entry.
Click to call the phone number associated with the selected entry.
Click to re-send the selected outgoing fax with dialing the number to which this fax was sent or attempted to send before.
Click to re-send the selected outgoing fax manually (the voice call should be established).
Click to forward the selected outgoing or received fax. Selecting this option opens the Create Fax Wizard window, where you can enter a fax number. (See also in the Send a Fax with Create Fax Wizard chapter of this user manual).
Click to re-send the selected outgoing audio message with dialing the number to which this message was sent or attempted to send before.
Click to re-send the selected outgoing audio message manually (the voice call should be established).
Click to forward the selected call recording or outgoing audio message. Selecting this option opens the Create Audio Message Wizard window, where you can enter a phone number. (See also in the Send an audio message with Create Audio Message Wizard chapter of this user manual).
Click to delete the selected entries.
Click to refresh the contents of the currently visible folder.
Click to open Help file.
The following commands are available in the Log Book main menu:
Click to view the selected fax or to play the selected audio message.
Click to print the selected fax.
Click to save the selected fax or audio message.
Click to send the selected fax or audio message by mail.
Click to call the phone number associated with the selected entry.
Click to manually re-send the selected outgoing fax or audio message (the voice call should be established).
Click to re-send the selected outgoing fax message or audio message with dialing the number to which this message was sent or attempted to send before.
Click to forward the selected fax or audio message to another recipient. Selecting this option opens the window, where you can enter a phone number.
Click to delete the selected entries.
Click to view properties of the selected entry.
Click to quit the Log Book.
Click to select all the entries in the list.
Click to unselect all the entries in the list.
Click to invert the selected entries in the list.
Click to show or hide the toolbar.
Click to show or hide the statusbar.
Click to show or hide the Preview Panel.
Click to show or hide the Folder Bar.
Tick this option to display large icons in the main toolbar.
This option allows you to choose the Toolbar Visual Style in accordance with Visual Themes provided by the operating system. Simply choose the desired theme from the context menu.
This option allows you to choose the Visual Style of the Folder Bar in accordance with Visual Themes provided by the operating system. Simply choose the desired theme from the context menu.
Shows the standard Color dialog where you can choose the background color of the Preview Panel. You can also show this dialog by clicking the right mouse button on the top or bottom part of the Preview Panel.
Click to refresh the contents of the currently visible folder.
Use this option to restore the default view of the Log Book.
Click to Add/Remove the columns to display and set their order. See also in the Configure Log Book views chapter of this manual.
Click to open Help file.
Display program information, version number and copyright.